Over the past month or so, as part of a larger group assignment, I used C++ and Unreal Engine in a real-world project for the first time. The group assignment was to create a networked dodgeball game, and my role was the character controller and networking.
Being a university assignment, this was the perfect opportunity to experiment with technology I had never used before. I have long been fascinated with the inner workings of character controllers in video games, and I used the opportunity this assignment presented to create my own character controller from scratch, using C++ and Unreal Engine.
Planning
Before implementing the character controller, all components must be planned as appropriate. This group project is relatively short-term, with much more to do than just the character controller. As such, there is no time to go back and redo things if we implement them wrong.
Character Movement
Our group planning process isn’t too relevant to this blog post, so I’ll summarize by saying we were targeting a Quake or Titanfall-like moveset. That is, very fast-paced movement; momentum is everything, wall running, wall jumping, vaulting, and sliding.
If we had a video to summarize the perfect character movement we were aiming to achieve, then this would be it:
Whilst that character movement looks (and largely is) very complex and intricate, it can be broken down into distinct movement types that can all be implemented independently with much lower complexity. There are two movement types which are absolutely essential for a minimum viable product (MVP) of our dodgeball game:
- Grounded: The most obvious type of movement. This movement type supports the player moving along the ground. The speed they are moving (walking v.s. sprinting) is largely irrelevant to the movement type; it’s all about traversing ground geometry.
- Airborne: The other most obvious movement type. This movement type supports the player moving when not in contact with any ground geometry.
Supporting those two movement types is the absolute priority because the game cannot function without them. However, once our MVP is complete, we can start to explore the implementation of other types of movement:
- Sliding: This move type allows the player to slide along the ground with little control over their direction once the slide starts. The slide enables the player to move with a speed boost at the expense of control. The character must already be grounded to initiate a slide.
- Wall running: This move type allows the player to move in one direction along a wall. The player will be automatically dismounted when their forward velocity is too low or they jump (in which case they will be pushed off the wall with some forward velocity). Wall runs can be chained by jumping from wall to wall in succession.
- Vaulting: This move type allows players to clear obstacles in front of them if they are low enough (such as window frames or small boxes). It’s crucial that vaults are fast and can be chained with other movement types to maintain momentum.
We will unlikely implement all of these different movement types by the time this assignment has to be submitted, but we planned for them and left room for their implementation. There is a reasonable period between when all assignments are due and the Graduate Showcase, which is when I plan to polish up our group project ready to be showcased there.
Implementation
Before implementing the character controller, I planned how I would actually go about doing so. A character controller can be a large and complex project, so I wanted to ensure I got this right.
This assignment was an opportunity for learning, so I knew I wanted to build the controller from scratch. Whilst making it out of the building blocks Unreal Engine provides would have been significantly faster, that would have provided less opportunity to learn how a character controller truly works under the hood. As such, I decided to implement the entire controller from scratch, using a bespoke physics routine based on the implementation within Quake III. The advantage of referencing Quake III is that the source code is available online, which I can use as a guide when necessary.
Additionally, I took learnings from a previous character controller that I had some limited contributions to called Chickynoid. Chickynoid is also based on Quake and is a server-authoritative character controller for Roblox. Chickynoid is based loosely on Quake and was also a great source of learning for this project.
Detecting Collisions
Sweep testing is the foundation of Quake III’s character controller and is how it detects collisions with world geometry. The principle behind a sweep test is that instead of checking for an intersection between an object and the environment at a single point in time (which can lead to tunnelling issues where an object moves so fast that it passes through another object between frames), the game checks for intersections over the interval of time that corresponds to a single frame of movement.
This is done by essentially “sweeping” the character’s shape (usually represented as a simplified geometric shape like a sphere or a box) along the path they would take during that frame and checking if this swept shape intersects with any of the environment geometry. If an intersection is detected, the game can then respond appropriately.
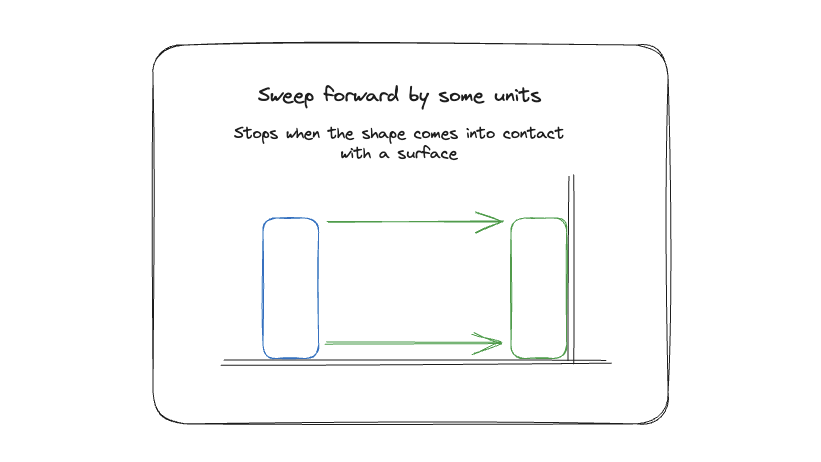
 Demonstration of a sweep test, a simple example of moving a box throught the world until it hits a wall.
Thankfully, I don’t need to re-implement sweep tests myself because Unreal Engine already has an equivalent API built into the engine. As much as I’m using this as a learning opportunity, re-implementing an entire physics pipeline in such a short timeframe is too unrealistic. The SweepSingleByChannel API is capable of sweeping a physics shape through the world and reporting any collisions it encounters.
Movement Types
As already explored, the character controller can be broken down into a distinct set of movement types (from here on out, we’ll refer to these as “move types” or MoveType in C++).
We need a way to represent move types in C++ that allows us to create as many move types as required without coupling each move type to one another. I have a strong background in the Rust programming language, and in Rust, this would be represented perfectly by using traits, which allows you to define shared behaviour in a structured manner. Take this example:
1
2
3
4
5
6
7
8
9
10
11
12
13
14
15
16
17
18
19
20
21
22
23
24
25
26
27
28
29
30
31
32
33
34
35
36
37
38
39
40
// Both no-ops for the sake of example here.
struct Simulation;
struct Command;

trait MoveType {
    fn name() -> String;

    /// Ticks this move type. Tick takes a mutable reference to the character
    /// simulation (i.e. it can change simulation state) and an immutable
    /// reference to the command that tick. A command contains the player's
    /// input and the delta time since the previous tick.
    fn tick(&self, simulation: &mut Simulation, command: &Command) -> ();
}

struct MoveTypeWalking;

impl MoveType for MoveTypeWalking {
    fn name() -> String {
        "MoveTypeWalking".into()
    }

    fn tick(&self, _simulation: &mut Simulation, _command: &Command) {
        // Do walking simulation stuff
        // ...
    }
}

// For the sake of example, we also implemented `MoveType` for `MoveTypeFlying`.
struct MoveTypeFlying;

/// The tick method takes a reference to any move type, and also to a simulation
/// and command, the same as above.
fn tick<T: MoveType>(
    move_type: &T,
    simulation: &mut Simulation,
    command: &Command
) {
    println!("Ticking simulation...");
    move_type.tick(simulation, command);
}
In this code example, we define a MoveType trait, which allows us to implement as many move types as desired and accept any unique implementation as an argument to the tick function.
This concept can also be expressed in C++ in two different ways. The first is by using abstract base classes. Abstract base classes in C++ allow for polymorphic behaviour, similar to how traits are used in Rust. However, there are some differences. In C++, abstract base classes can have data members (fields), while Rust traits cannot. On the other hand, Rust traits can have default method implementations, which C++ abstract base classes cannot. Here’s an example:
1
2
3
4
5
6
7
8
9
10
11
12
13
14
15
16
17
18
19
20
21
22
23
24
25
26
27
28
29
30
31
32
33
34
35
36
37
38
39
40
41
42
43
#include <string>
#include <iostream>

// Both no-ops for the sake of example here.
struct Simulation {};
struct Command {};

class MoveType {
public:
    virtual std::string name() const = 0;
    virtual void tick(Simulation& simulation, const Command& command) const = 0;
};

class MoveTypeWalking : public MoveType {
public:
    std::string name() const override {
        return "MoveTypeWalking";
    }

    void tick(Simulation& simulation, const Command& command) const override {
        // Do walking simulation stuff
        // ...
    }
};

class MoveTypeFlying : public MoveType {
public:
    std::string name() const override {
        return "MoveTypeFlying";
    }

    void tick(Simulation& simulation, const Command& command) const override {
        // Do flying simulation stuff
        // ...
    }
};

// The tick function takes a pointer to any move type, and also to a simulation
// and command, the same as above.
void tick(const MoveType* move_type, Simulation& simulation, const Command& command) {
    std::cout << "Ticking simulation..." << std::endl;
    move_type->tick(simulation, command);
}
Starting with C++20, C++ introduced concepts, which are more similar to Rust traits. Concepts define a set of requirements (such as functions that must be implemented) that a type must satisfy. Here’s a simple example:
1
2
3
4
5
6
7
8
9
10
11
12
13
14
15
16
17
18
19
20
21
22
23
24
25
26
27
28
29
30
31
32
33
34
35
36
37
38
39
40
#include <string>
#include <iostream>

// Both no-ops for the sake of example here.
struct Simulation {};
struct Command {};

template<typename T>
concept MoveType = requires(T t, Simulation& simulation, const Command& command) {
    { T::name() } -> std::same_as<std::string>;
    { t.tick(simulation, command) } -> std::same_as<void>;
};

struct MoveTypeWalking {
    static std::string name() {
        return "MoveTypeWalking";
    }

    void tick(Simulation& simulation, const Command& command) const {
        // Do walking simulation stuff
        // ...
    }
};

struct MoveTypeFlying {
    static std::string name() {
        return "MoveTypeFlying";
    }

    void tick(Simulation& simulation, const Command& command) const {
        // Do flying simulation stuff
        // ...
    }
};

template<MoveType T>
void tick(T& move_type, Simulation& simulation, const Command& command) {
    std::cout << "Ticking simulation..." << std::endl;
    move_type.tick(simulation, command);
}
For my implementation, I’ll be going with abstract base classes. I chose this option because C++ 20 still has patchy support in Unreal Engine, and it’s unclear if I can currently use C++ concepts with the compiler toolchains that UE supports. Additionally, abstract base classes have a better online knowledge base surrounding them, which will likely make solving issues related to them significantly more straightforward.
Conclusion
This entry’s purpose was to outline the planning of my C++ character controller. In the next blog entry, I will cover how I implemented the controller in C++ and where I ultimately ended up with its implementation. I have a clear vision of how to implement this controller, and I have outlined the most important parts in this entry.