After planning the character controller, it was time to implement it. The implementation so far has been very involved, so I will only cover the high-level points required to get to a minimally viable character controller.
Architecture
To support the extensible nature of this character controller, it needs to be architectured in much of a “distributed” manner. This means there is a central Simulation class that manages and orchestrates any number of MoveTypes.
This choice of architecture is highly beneficial because it leaves so much room for future expansion. All move types are entirely decoupled from one another, so they can be changed and added trivially without impacting other move types. Keeping move types in distinctly separate classes also simplifies maintenance and documentation because of the clear separation of concerns.

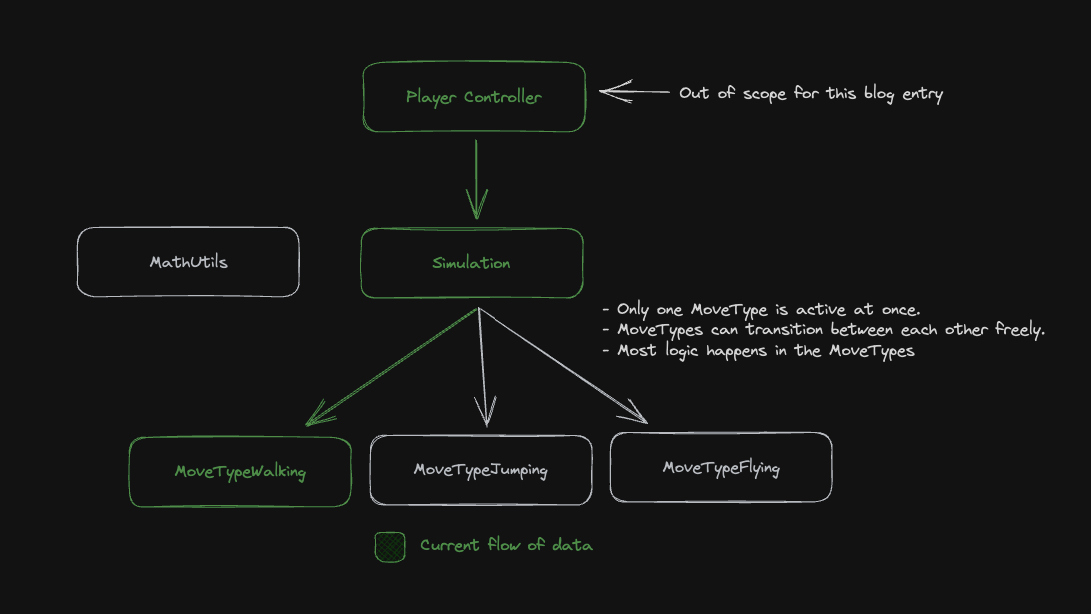 Visual example of this choice of architecture. Highlights the clear separation of concerns and flow of data.
Simulation Class
At the core of the controller is the Simulation. This class orchestrates and manages the lifecycle of all MoveTypes. It works like this:
- The Simulation stores most state relevant to the running of the character’s physics sim. This includes:
- Simulation constants (walk speed, run speed, jump height, etc.)
SimulationState, a struct that contains the runtime state of the Simulation, such as the currentMoveType, and the velocity and position of the character.
- The Simulation exposes several utility methods for use by move types. For example, the
Sweepimplementation is defined in the Simulation as a public method. Our Sweep method abstracts away the gritty details of Unreal Engine’s Sweep API, giving the developer a straightforward interface for performing Sweep tests in the world. Other methods, such asProjectVelocity, are also defined here, which we’ll explore later. - The Simulation exposes methods for transitioning to a new
MoveType. It handles cleaning up the oldMoveTypeand ensuring the new one runs in the same frame (if that was specified as an option). Finally, the Simulation exposes a public method for ticking the sim forward. This method is very lightweight because it only calls theTickmethod in the activeMoveTypeand reconciles and changes.
Most of the work in the Simulation class happens in the utility methods, which can be relatively complex. However, in concept, the Simulation class only orchestrates the MoveType classes.
MoveType Classes
The MoveType classes are the backbone of our character controller and can be best thought of as state machines that define how the character can move. Each MoveType class is unique and encapsulates the behaviours and rules for a specific movement type, such as walking, running, jumping, or crouching. By keeping these behaviours separate, we can create a clean, maintainable codebase where each movement type can evolve independently from the others.
MoveType classes are designed with extensibility in mind. Each class is independent and agnostic of the others, so developers can easily add new movement types or modify existing ones without worrying about unexpected side effects. For instance, if you wanted to add a new “gliding” move type, you could simply create a new MoveType subclass that encapsulates the gliding behaviour and then register it with the Simulation class. This approach makes the character controller highly flexible and adaptable to various game designs and character movements.
Implementing the Physics Simulation
As already discussed in the previous blog entry, this character controller is built on the concept of sweep testing. Please refer to the previous entry for an explanation of what sweep testing is and how it is performed.
The Simulation class exposes a Sweep utility method that abstracts away the details of Unreal Engine’s built-in sweeping API. This utility method removes all the boilerplate required to sweep in Unreal Engine, creating a vastly simplified API for developers to consume.
1
2
3
4
5
6
7
8
9
10
11
12
13
14
15
16
17
18
std::tuple<bool, FHitResult> ACharacterController::Sweep(const FVector StartPosition, const FVector EndPosition) const
{
    FCollisionQueryParams Params = FCollisionQueryParams();
    Params.bTraceComplex = true;

    FHitResult SweepResult;
    bool Hit = GetWorld()->SweepSingleByChannel(
        SweepResult,
        StartPosition,
        EndPosition,
        SweepRotation,
        ECC_PhysicsBody,
        SweepShape,
        Params
    );

    return {Hit, SweepResult};
}
For a visual aid, here is a diagram showcasing how a Sweep works:
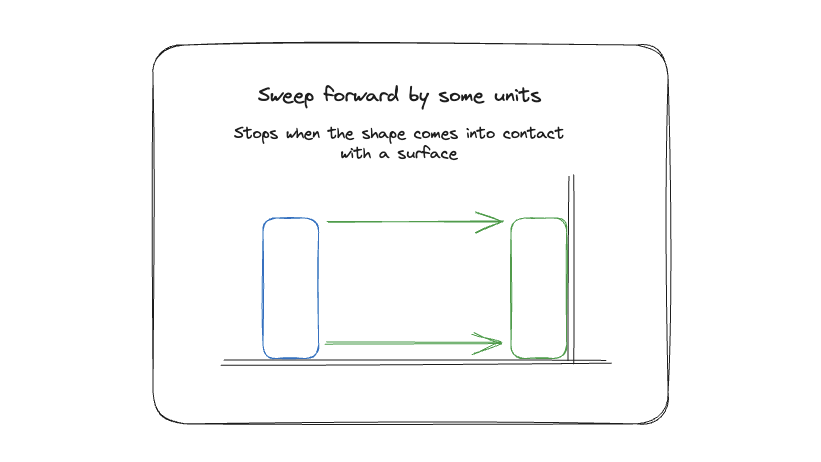
 Demonstration of a sweep test, a simple example of moving a box throught the world until it hits a wall.
All other physics routines are built on top of this method. For example, we detect if the player is standing on the ground by sweeping down from a position a very tiny amount. They are considered to be grounded if the sweep hits something.
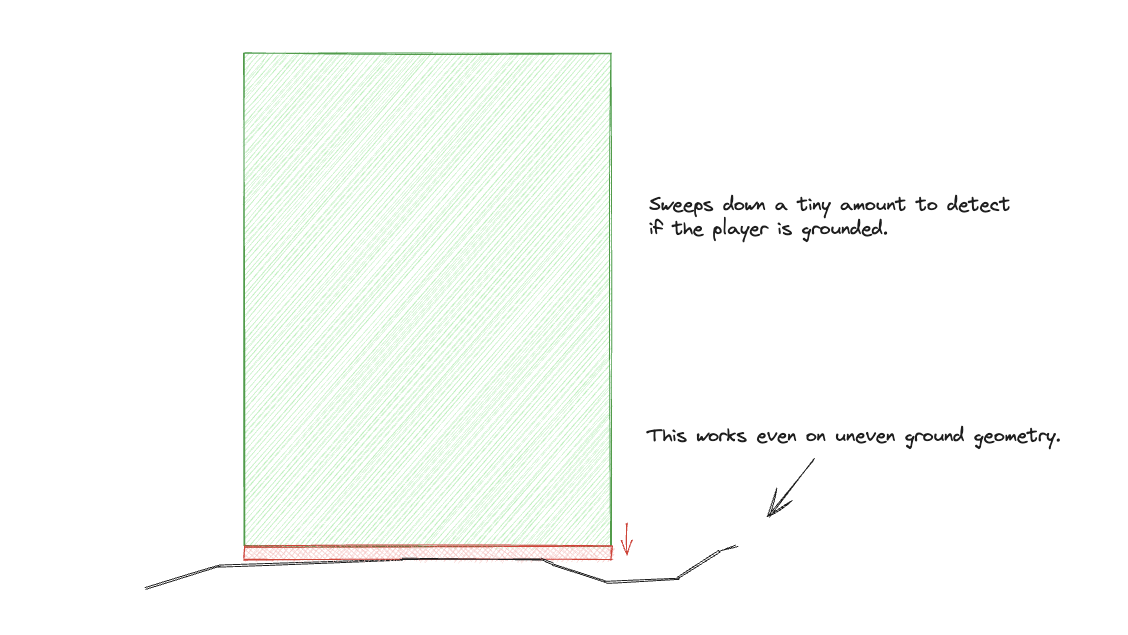
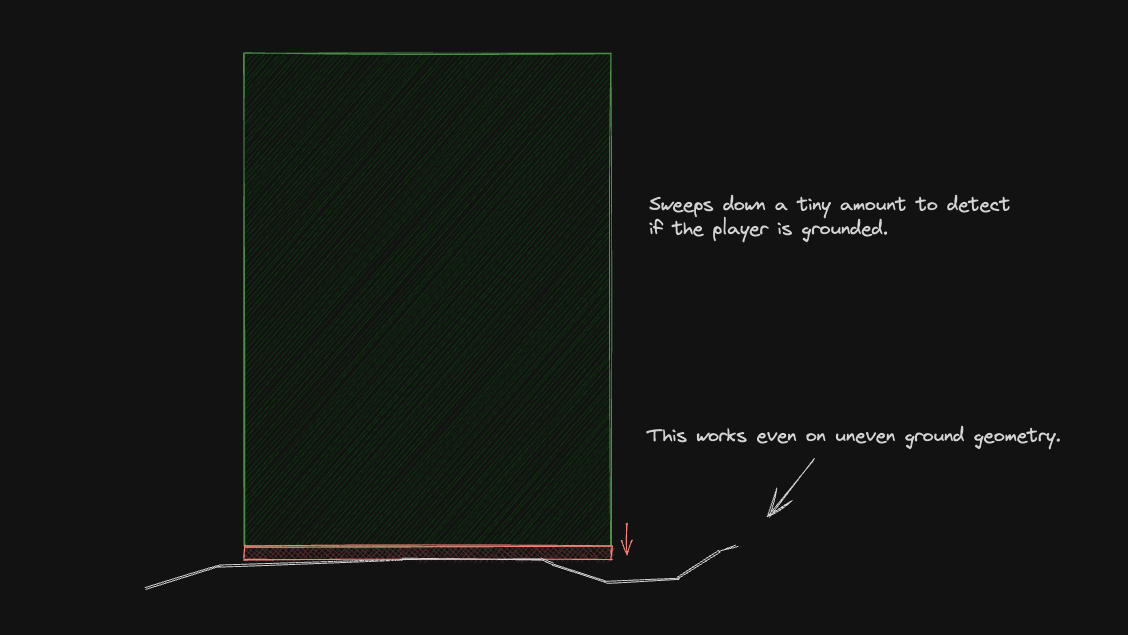 Visual example of how GoundCheck queries work.
ProjectVelocity
Another core component of the physics routine is the ProjectVelocity method. The implementation of this routine is based heavily on that of Quake and Chickynoid, as discussed in the previous blog entry.
ProjectVelocity projects the character through the world based on some velocity over a certain period of time (given by DeltaTime). This builds on top of sweeps by handling velocity deflections as the player moves along surfaces. ProjectVelocity is the magic that allows players to slide along walls!
The idea looks like this:
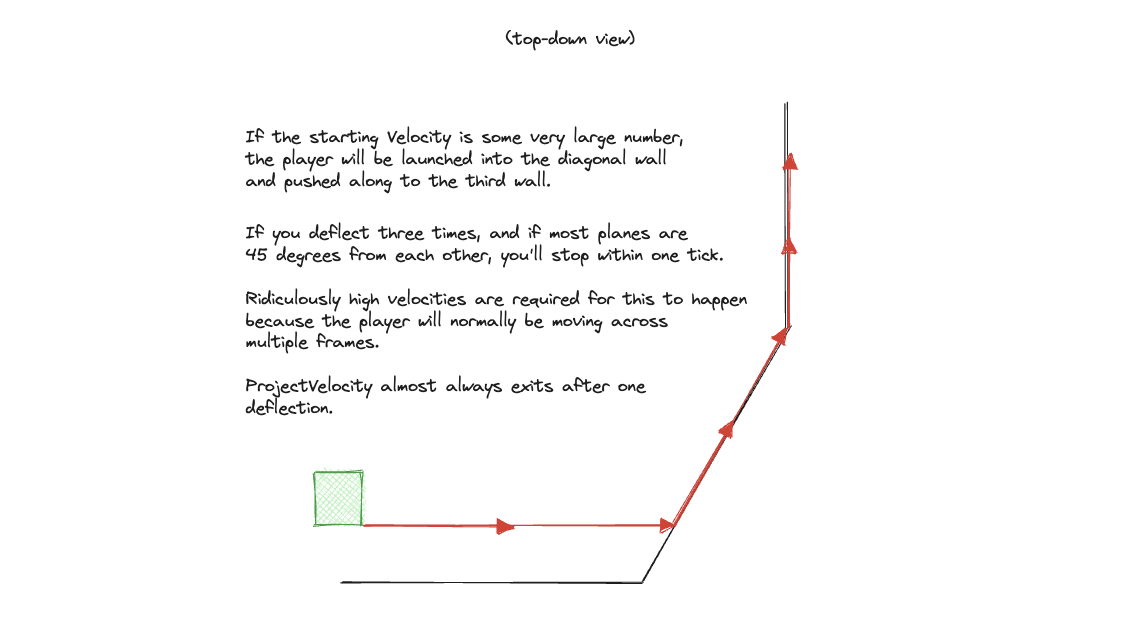
 Demonstration of ProjectVelocity. This diagram is recreated from one the author of Chickynoid used to teach my the idea behind this technique (thank you ❤️).
In this diagram, the player is projected by some significant velocity value and deflected along three different walls. This behaviour of sliding along walls is achieved through a combination of sweeps and handling of the resulting collision normals.
1
2
3
4
5
6
7
8
9
10
11
12
13
14
15
16
17
18
19
20
21
22
23
24
25
26
27
28
29
30
31
32
33
34
35
36
37
38
39
40
41
42
43
44
45
46
47
48
49
50
51
52
53
54
55
56
57
58
59
60
61
62
63
64
65
66
67
std::tuple<FVector, FVector, bool> ACharacterController::ProjectVelocity(
    FVector StartPosition,
    FVector StartVelocity,
    float DeltaTime
) const {
    FVector MovePos = StartPosition;
    FVector MoveVel = StartVelocity;
    bool HitSomething = false;

    TSet<uint32> HitObjects;
    float TimeLeft = DeltaTime;

    for (int i = 0; i < 4; ++i)
    {
        if (MoveVel.Length() < 0.001f)
        {
            break; // Done
        }

        if (MoveVel.GetSafeNormal().Dot(StartVelocity.GetSafeNormal()) < 0.0f)
        {
            // We projected back in the opposite direction from where we started
            MoveVel = FVector(0, 0, 0);
            break;
        }

        // We only operate on a scaled down version of velocity
        auto [_, Result] = Sweep(MovePos, MovePos + (MoveVel * TimeLeft));

        // Update our position
        if (Result.Time > 0.0f)
        {
            MovePos = Result.TraceEnd;
        }

        // See if we swept the whole way
        if (Result.Time == 1.0f)
        {
            break;
        }

        // We'd have broken here if we didn't hit something
        HitSomething = true;

        // Hit!
        TimeLeft -= (TimeLeft * Result.Time);

        const uint32 HitId = Result.HitObjectHandle.GetInstanceUID();

        if (HitObjects.Contains(HitId) == false)
        {
            HitObjects.Add(HitId);

            // Deflect the velocity and keep going
            MoveVel = FMathUtils::ClipVelocity(MoveVel, Result.Normal, 1.0);
        }
        else
        {
            // We hit the same object twice, push off it a bit
            MovePos += Result.Normal;
            MoveVel += Result.Normal;
            break;
        }
    }

    return {MovePos, MoveVel, HitSomething};
}
This code looks rather complex, but here’s a deep dive into how it works:
Whenever the character moves and potentially collides with something, ProjectVelocity calls the Sweep method. This method tests the trajectory of the character from its current position to its expected position after the given time step, considering the current velocity. If a collision is detected, the Sweep method returns an FHitResult struct with a Normal vector. This Normal is a unit vector perpendicular to the surface with which the character collided.
When ProjectVelocity receives this Normal, it uses it to deflect the character’s velocity, allowing the character to “slide” along the surface instead of stopping upon collision. This is achieved by the ClipVelocity function, which modifies the character’s velocity based on the collision normal.
So, if the character moved directly towards a wall and collided with it, the normal would be directed away from it, causing the character to stop. But if the character collided with the wall at an angle, the normal would be somewhat sideways, causing the character’s velocity to be deflected sideways as well. This is what allows the character to slide along walls instead of stopping.
The process is repeated up to three times within a single call to ProjectVelocity, allowing multiple deflections. However, this choice of deflection count is not arbitrary. It is directly referenced from Quake III and is based on the geometric principle that it takes three planes intersecting to form a concavity that would fully catch and stop a ray. In other words, in the most complex case, the character would need to deflect off of three surfaces to navigate a corner. Despite this, the loop will usually exit after the first deflection.
This is how the character can quickly slide along multiple surfaces, as illustrated in the diagram. Each deflection represents a potential change in direction, allowing the character to navigate complex environments smoothly.
Keep in mind that the actual physics behind this behaviour is a bit more complex, including how the character’s speed is affected by these deflections, but this gives a general idea of how ProjectVelocity allows characters to slide along walls. A lot of credit goes to the Quake III and Chickynoid source codes as a reference to help implement this, as the math was rather complex.
Retrospective
I learnt a lot throughout this project! The controller fulfilled the majority of the requirements initially laid out. As a group, we re-implemented this controller in Unity as we changed the engine part way through our group project (that’s worth a whole other blog post). Having the opportunity to do this again with C# allowed me to fix many of the mistakes I made in this C++ version, but again, that’s for another blog entry.
This controller has one big, glaring issue: it’s incompatible with Unreal Engine networking. I should have had more due diligence initially when investigating how networking would play out in this scenario. Still, I ultimately needed to use Unreal’s built-in character framework to network the character because it was simply too much work to do ourselves. If we hadn’t moved to Unity (for unrelated reasons), I would have invested the time to refactor the controller to extend off Unreal’s built-in character tools.
Despite the unfortunate problem of the controller being unable to meet our networking goal, I learnt heaps from this project. As already mentioned, this was my first time ever using C++ and Unreal Engine in any non-trivial capacity, and I got to grips with C++ incredibly quickly. I suspect this is thanks to my experience with other systems languages like Rust and my years working in game engines like Roblox.
On the bright side, I got to re-purpose this character controller for another solo assignment – so all was not lost! The assignment I ultimately used this project for was a great fit, and being able to re-purpose it saved me a lot of time.